Hungarian Mushroom Soup

It’s been a rainy and dreary couple of days here in Charleston so perfect weather for curling up with my pugs and a book and making some soup. My Papa actually shared this recipe for Hungarian Mushroom Soup. He had it at a restaurant a few weeks ago, went crazy for it so made it at home for the family. I couldn’t stop thinking about it so this icky weather was just the necessary push to make a pot of my own. I made it for dinner and it was phenomenal! The richness of this mushroom soup really comes out with the flavors of parsley, dill, lemon and Hungarian paprika.  Definitely one to add to the recipe book for cold or rainy days.

Plated Soup

Hungarian Mushroom Soup
Serves: 6

Ingredients:

4 tablespoons butter
1 large onion, finely diced
5 cloves garlic, minced
1 pound fresh mushrooms, sliced
2 teaspoons dried dill weed
2 tablespoons Hungarian paprika
1/4 teaspoon cumin
3 tablespoon soy sauce
2 cups chicken broth
1 cup milk
3 tablespoons all-purpose flour
2 teaspoon salt
ground black pepper to taste
2 teaspoons lemon juice
1/4 cup chopped fresh parsley
1/2 cup sour cream

Heat a large soup pot over medium heat and melt butter. Add onions and sauté for 5 minutes, stirring regularly.

Onions

Add mushrooms and garlic and sauté an additional five minutes, stirring regularly.

Mushrooms

Mushroom and spices

Stir in dill, paprika, cumin, soy sauce, and broth. Reduce heat to low, cover, and simmer for 15 minutes.

Broth simmer

In a small bowl, whisk together flour and milk and add to soup.

Milk

Cover and simmer for an additional 15 minutes, stirring occasionally.

Milk 15 min

Turn off the heat and add salt and pepper, lemon juice, parsley and sour cream.

Parsley

Mix together until incorporated. Serve soup in bowls with a dollop of sour cream, a dash of paprika and parsley for color, and a crusty wheat or french bread for dipping.

Plated Soup

This soup is so good that you’ll start wishing for cold and rainy days! Many thanks to my Papa (@LifeCoach4Men) for another amazing recipe!

Baby Blueberry Key Lime Pies

I came up with this recipe when I couldn’t decide between making a blueberry pie and a key lime pie. I tend to be more partial to blueberry but my boyfriend is smitten by all things key lime. So I resolved that inner conflict by inventing one that marries the two favorites. The result was amazing and I was delighted by the beautiful color (purple is my favorite!).

This recipe is about the easiest and quickest dessert recipes in my inventory but it looks and tastes a lot more involved. I love sneaky recipes like this one! 🙂

While you can certainly use this recipe to fill a large pie shell, there’s really fun about presenting each of your guests with their own baby pie. This is also a great recipe for baby showers or other parties; it’s a cinch to double and they hold up really well.

Baby Blueberry Key Lime Pies

Baby Blueberry Key Lime Pies
Makes 12 baby pies or 1 large pie

Ingredients

  • 1 pint fresh blueberries
  • 1 cup key lime juice
  • 1 tablespoon grated lime zest
  • 2 (14 ounce) cans sweetened condensed milk
  • 1/2 cup sour cream
  • 12 miniature graham cracker crusts

Preheat oven to 350°F.

In a small pan over medium high heat, combine blueberries and lime juice and bring to a boil. Reduce and simmer for 2-3 minutes until the blueberries start to soften.

Blueberry & Lime Juice

Remove from heat and cool in the refrigerator.

In a medium bowl, mix together the lime zest, sweetened condensed milk, and sour cream.

milk and lime

Add the cooled blueberry mixture and mix until smooth.Check out that gorgeous color!

blueberry lime mixture

Pour the mixture into the prepared graham cracker crust. Be sure to fill to fill as closely to the top as possible. They will settle down a bit during baking.

Filled pies

Bake baby pies in preheated oven for 15 minutes. Remove from oven and let cool. Be sure to chill in the refrigerator before you serve as they taste best chilled. Garnish with lime slices and/or whipped cream and serve.

Plated Pies

Creamy Parmesan Tilapia

I love fish and while I’m not as comfortable cooking with it as I am with poultry and red meat, I’m learning and experimenting. After trying a similar recipe that turned out okay, I did some tweaking and the result was my Creamy Parmesan Tilapia, which has become an instant hit. I love this recipe because it’s deliciously simple and on the table in practically no time at all! It definitely works well as a busy weekday dinner. Plus, it uses up ingredients we almost always have on hand so there’s no mad dash to the store to pick up anything up.

Creamy Parmesan Tilapia
Serving Size: 4

Plated Tilapia

Ingredients

  • 4 (4-6 ounce) fresh tilapia filets
  • 1/2 teaspoon lemon pepper
  • Salt & Pepper to taste
  • 1/4 cup mayonnaise
  • 1/2 cup Parmesan cheese
  • 1 lemon, juiced
  • 1/4 cup seasoned panko breadcrumbs
  • 1/2 teaspoon fresh parsley, chopped

Directions

Preheat your oven to broil.

In a small bowl, mix together Parmesan cheese, mayonnaise, lemon juice, and a dash of salt & pepper. Set aside.

Parmesan Mayo Mixture

Carefully wash each filet and pat each side down with paper towels.

Fresh tilapia

Line a baking dish with aluminum foil and lay the filets down. Sprinkle each side with salt and lemon pepper.

Lemon Peppered Filets

Broil for 3 minutes. Remove from oven, flip filets, then broil the other side for 3 minutes. Remove from oven.

Briled one side

Spread the Parmesan-mayo mixture over the fillets and broil for 2 minutes. Remove from oven and sprinkle Panko and return to broil for 30 seconds to a minute or until the Panko is nicely browned. Keep a very close eye on it as the broiler has a tendency to go infernal if left unattended.

Broiled Fish

Remove from oven and garnish with fresh parsley and a little extra Parmesan cheese.

Finished fish

I make this once or twice a month and like to pair it with my Veggie Quinoa and a fresh green salad. Such a nice summer meal!

Plated Tilapia

Extraordinary Bacon Chocolate Chip Cookies

First a little background: My boyfriend is in film school and I often cook and bake for the crew when he’s filming. This time around he’s shooting a short film about people’s obsession with bacon. Neither of us were bacon-aholics but we might soon be after eating these cookies. I’ve heard of strange bacon recipes but never ventured out in trying any of them until yesterday. Tom needed a prop for his film and someone threw out bacon chocolate chip cookies so I was tasked with the project of creating the concoction.

Not surprisingly, there aren’t many recipes out there but I reviewed the few I found and took bacon elements from some of them, but ultimately incorporating them to my favorite chocolate chip cookie recipe, which is soft and chewy in the middle but nice and crispy on the edges. One thing I tried on the first batch (fully prepared to pitch and start again) was swapping out some of the butter with bacon fat. I know, I know, sounds a little wrong and maybe a little gross but Bacon Chocolate Chip Cookies sort of screams all things wrong and fabulous so I gave it a whirl. To my absolute shock, I tasted the batter prior to adding the chocolate chips and bacon and was absolutely gobsmacked. ERMAHGERD amazing! Best cookie dough ever! Needless to say, the end results, with chocolate chip cookies and bacon mixed in, were beyond phenomenal and have been hailed a culinary triumph by all. I’m actually quite sad that they have to be used for props but maybe that’s a good thing for my waistline!

Extraordinary Bacon Chocolate Chip Cookies
Makes about 2 dozen cookies

Bacon Chocolate Chip Cookies

Bacon Prep

Ingredients:

  • 8 slices of uncooked extra thick-cut bacon
    • You can use more or less and any cut you prefer to suit your bacon taste. 🙂
  • 1/4 cup brown sugar
  • 1/2 cup maple syrup

Preheat oven to 400°F. Line an edged baking sheet or casserole dish with aluminum foil and lay out the strips of bacon. The aluminum foil helps to catch the drippings but makes cleanup a cinch.

Foiled Sheet with Raw Bacon

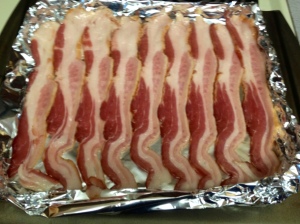
Sprinkle the brown sugar and drizzle the maple syrup all over the bacon.

Raw Bacon with brown sugar and maple syrup

Bake for 15-20 minutes or until bacon is nice and crisp. If you use a thinner cut bacon, be sure to keep an eye on it as it won’t need the full 20 minutes.

Remove bacon to a plate lined with paper-towels and let cool.

Reserve 1/2 cup of the bacon fat from the pan for the cookie batter.

Bacon Fat

*Note: I have found the easiest and best way to cook bacon is in the oven. If you prefer your own method that is totally fine!

Cookie Batter

  • 1/2 cup reserved bacon fat, melted
  • 1/4 cup butter, melted
  • 1/2 cup sugar
  • 1 cup packed brown sugar
  • 1 egg
  • 1 egg yolk
  • 1 tablespoon vanilla extract
  • 2 1/2 cups all-purpose flour
    • Note: Do NOT sift the dry ingredients, as that will result in a more cake-like cookie.
  • 1/2 teaspoon baking soda
  • 1/2 teaspoon salt
  • 1 cup semisweet chocolate chips
  • 1 cup bacon, roughly chopped

Preparation:

Preheat oven to 325°F. Spray your cookie sheets with baking spray and set aside.

In a large bowl, cream sugar together with the melted butter and bacon fat.

image_2

Add the egg, egg yolk, and vanilla extract and beat until creamy. Gradually add the flour, baking soda, and salt, making sure to beat vigorously to incorporate well.

Batter

Take the cooked bacon you set aside and on a cutting board, roughly chop into bite-sized bits. You should have about 1 cup.

Bacon

Mix bacon and 1 cup chocolate chips into the batter until well blended.

Batter

Using a small or medium cookie scoop, drop the cookies on the prepared cookie sheets, about 2-3 inches apart.

Cookie scoop

Cookies on sheet

Bake for 15 minutes or until lightly golden and brown. Cool on sheet for a few minutes before transferring to a cooling rack.

Bacon Chocolate Chip Cookies

*Baking Tip: One of my best cookie baking tips actually came from my boyfriend. Always, always, always, bake one cookie, all by its lonesome self, on a cookie sheet at the prescribed time to see if that’s the right time for your oven, altitude, etc since no two ovens are exactly alike. I was notorious for burning an entire sheet of cookies before learning this trick. Better to burn one cookie than to scorch a dozen!

When the cookies have cooled for a few minutes, it’s time to eat! I hope you enjoy!

Bacon Overload Cookie

Just for fun, I took a little leftover bacon and made a bacon overload chocolate chip cookie. I took the above batter and pressed some extra bacon on top before baking.

Bacon Overload Dough

This is a great idea if you are making these cookies for a super bacon-aholic! Just be sure to cook up extra bacon if you decide to try it! 🙂

Bacon Overload Cookie

Easy Cheesy Steak Taquitos

My boyfriend, Tom, has an unequaled love for taquitos. If he had to eat one meal for the rest of his life, taquitos would happily be on his menu. Unfortunately, the frozen variety are fried and filled with preservatives and all sorts of junk. While frozen are super quick and easy, homemade are actually almost as quick and easy but so much better for you and even better tasting. This is also a super kid-friendly meal so you can get your little helpers in the kitchen. My favorite thing about this meal is that you can use up leftovers to make them by substituting out the meat and veggies for practically anything you have that you need to use up.

Cover

Makes 12 taquitos

Ingredients

  • 1 tablespoon extra virgin olive oil
  • 1 small onion
  • 6 ounces steak, chopped into bite-size pieces
    • I used strip but you can use also use  flat iron, top sirloin, London broil, etc,
  • 1/2 cup of corn
  • 1 cup of Mexican blend cheese
  • 1/4 cup chopped green onion
  • 1/2 cup salsa
  • 2 tablespoons taco seasoning
  • 12 (6-inch) flour or corn tortillas
  • 12 toothpicks
  • Sour cream, guacamole, or salsa for dipping, optional

Directions

Preheat oven to 375°F. Spray a large baking sheet with cooking spray.

In a medium sauté pan, add olive oil and cook onion for 1-2 minutes on medium high heat. Add chopped steak and cook until no longer pink in the center. Remove from heat and allow to cool while you work on the rest of the filling.

Grilled steak and onions

In a small bowl, mix corn, cheese, green onion, salsa, and taco seasoning  until well blended.

Filling mixture, without steak and onions

Mix in the cooled onion and steak mixture.

Filling mixture

To ensure your tortillas are nice and pliable for rolling, wrap the tortillas in a couple damp paper towels and microwave on a plate for 30-45 seconds. This is also a great tip for taco and fajita night!

Working on a cutting board, lay out a tortilla and spread 3 heaping tablespoons of filling all over the tortilla.

Tortilla with filling

Roll up tightly, from bottom to top and fasten the seams with a toothpick. Continue rolling up the rest of the tortillas and then place on the baking sheet, about an inch apart.

Spray the tops of the taquitos with olive oil cooking spray and bake for 15 minutes, or until brown and nice and crispy.

Remove from baking sheet and cool for 5 minutes.

Don’t forget to remove the toothpicks before serving!
Plated Steak Taquitos

I serve with a side of Spanish Rice and little bowls of sour cream, salsa, or guacamole so guests can pick their favorite condiment. This will definitely be a huge hit and is also a great recipe idea for game day nibbles.

Brazilian Steak with Cilantro Lime Sauce

I’ve been craving red meat recently. Not super surprising since I don’t eat it very often. We tend to eat a lot of chicken and fish so when a red meat meat craving hits, it can hit pretty hard. I was really in the mood for a Brazilian Steakhouse so I challenged myself to recreate it at home! I made a super simple 2-in-1 marinade and sauce for the meat, invited a few friends over, and had a proper grill-out, Brazilian style! The steak was incredibly flavorful and fully satisfied my craving! I hope you’ll try this recipe because it really knocks it out of the park!

Title Photo

Brazilian Steak with Cilantro Sauce
Serves 8

Ingredients:

  • 3 cups fresh cilantro
  • 6 garlic cloves
  • 1 tablespoon kosher salt
  • 1 teaspoon ground pepper
  • 1/4 cup sugar
  • 1 cup olive oil
  • 1 cup red wine vinegar
  • 1/2 cup water
  • 4 limes, juiced and zested
  • 5 lbs. London Broil Steak
    • I used London Broil but you can use also use flat iron, top sirloin, or really any cut of meat you like to grill.

Directions:

Marinade/sauce:
In a blender, add cilantro, garlic cloves, kosher salt, pepper, sugar, olive oil, red wine vinegar, water, lime juice and zest.

image

Blitz until smooth. Reserve 2 cups to use as a marinade for the steaks and pour the rest of the sauce into a storage container and refrigerate until ready to serve.

Cilantro Marinade & Sauce

Preparing the steaks:

Raw Steaks

Using a meat tenderizer, give both sides of the steaks several good whacks with the side that has teeth (see photo below of my meat tenderizer). This part is quite fun, I assure you! 🙂

Tenderizing Meat

Place meat in a large casserole dish or large storage container. Pour 2 cups of the cilantro marinade over the steaks, making sure both sides are well coated. Seal container with lid or cover with plastic wrap and marinate in the refrigerator for 4 hours minimum. 6-12 hours is ideal since this marinade will work some serious magic on even the toughest cuts of meat!

Grilling Time!

After the meat is done marinating, it’s time to grill! Aim for a medium-high heat and then throw the steaks on when nice and hot. I love a medium rare steak so it took about 20 minutes (10 minutes per side) to achieve that.

Grilling Steaks

Cooking time will vary depending on the grill, steak cut, thickness, and desired internal temperature so keep that in mind and be sure to keep a close eye. This is where having a grill-safe meat thermometer comes in super handy!

Once you’ve removed the meat from the grill, slice at an angle in thin strips. Be sure to slice with the grain since slicing against the grain will results in chewy meat. Pile the sliced meat on a plate and serve alongside the remaining cilantro sauce. I put the sauce in a big bowl and just let my guests drizzle as much or as little as they liked.

Plated Steak
This dish was a huge hit and the steak was gobbled up in no time! I’ll definitely be making it again but will plan on leftovers next time as the meat would be great the next morning transformed into steak and eggs and for lunch as a nice steak salad or wrapped up in warm tortillas as fajitas. I did have cilantro sauce left over though, so my plan is to transform some boring tilapia later in the week into something a little more festive. I love recipes that keep on giving and this one really knows how to do exactly that!

Hello Kitty Cake

I love Hello Kitty! She’s such a cute cartoon and I love seeing her become more popular in the U.S. I recently hosted a Hello Kitty Birthday party and it was so much fun to decorate and bake for it. Party City had a lot of really cute decorations that I picked up and then I bought the rest from Amazon. The Hello Kitty cake was the centerpiece and definitely the hit of the party!

Hello Kitty Cake

It was more work than I anticipated but I had a blast making it. Wilton provides their own directions but I found them to be a bit over the top so my simplified version is below. Here’s what you’ll need:

  1. Wilton Hello Kitty Cake Pan
    Wilton Hello Kitty Cake PanWilton Hello Kitty Cake Pan
  2. Cake Mix
    • I vote funfetti or strawberry but you can do whatever floats your boat!
  3. 3 cups Butter Cream Icing for everything except the eyes, nose, whiskers, and bow
  4. Red, Black, and Yellow Icings
    • You can use Butter Cream again but I selected plain white to help the features pop a little more and to make sure the colors really blended well. You can use food coloring or if you want the official Wilton pre-colored frostings they are: Red-Red, Black, Lemon Yellow and Golden Yellow. I didn’t even want to attempt making black frosting so I did buy that pre-colored. You only need a little bit for the features (maybe 1/2 cup total) so I bought one little tub of white icing.
  5. Round and rosette tips
    • I happened to have a round tip but you could also stick with just a bag trimmed in the corner if you don’t have the round tips.
  6. Decorating Bags
  7. Parchment paper
    • To tuck under the cake while icing. You can also use paper towels in a pinch.

Directions:

Preheat oven to 350°F. Grease and flour your pan and set aside. Mix the cake mix batter according to the directions on the box. Pour batter into prepared pan, making sure to spread to make sure it’s evenly distributed. Gently lift pan and tap once or twice on the counter to release any little air bubbles. Bake for 35-40 minutes or until a toothpick inserted in the middle comes out clean. Let cake cool for 10 minutes or until you can touch the metal pan. Prior to removing, take a large knife and trim off the raised portion of the cake, using the sides of the pan as your leveler. Flip and remove cake from pan. Cake should come out easily but if necessary you can always run a plastic knife or plastic spatula around the edges to help loosen it. Let cake cool completely before frosting or else you’ll end up with a very Sad Kitty!

Icing Time!
Coloring the icing isn’t an exact science so plan on a little chemistry fun. Plan on 1/2 cup for the red and literally a heaping spoonful for the black and yellow. Then start adding your drops until you are happy with the color. Before you start icing the cooled cake, be sure you have it laid out on the platter or cake plate you plan to present it on. Then tuck in the parchment paper under the cake to keep the plate nice and clean in case any frosting decides not to stay on Kitty. 🙂
Start with the bow by using red icing and the round tip to pipe the inside loop of the bow. I just did two big globs and patted them down with my fingers (pat your finger in corn starch first if the frosting is too sticky). Then use the rosette tip to fill in the rest of the bow in red. Outline the inside and outside of the bow with black icing using the round tip. Then do the whiskers and nose in black icing with the round tip. Fill in the nose using yellow icing and the round tip. Just like the bow, do a big glob and then flatten down with your finger. Now the fun part! I do recommend taking a break at this part or planning on taking a couple short breaks during what comes next: filling out what’s left in butter cream with the rosette. You can start at any point you want but any brown cake bit that’s showing needs a tiny white rosette. This is the part that is brutal but the end result is gorgeous. Once done, remove the parchment paper, pat yourself on the back, and pour yourself a glass of wine.

Now you’re ready for a Hello Kitty Party or an awesome Friday night! 🙂
Hello Kitty Cake2

Avgolemono (Greek Chicken Soup)

This weekend was Charleston’s annual Greek Festival. It’s a great family event, filled with dancing, history lessons, vendors selling crafts and other goods, and delicious Greek delights. As you can imagine, it’s one of my favorite festivals. Sadly, we had a busy weekend so we weren’t able to squeeze it in this year. I was pretty bummed out but cheered myself up by recreating my favorite dish that I typically only get to enjoy once a year at the festival–Avgolemono. It’s basically a Greek Chicken Soup but has this amazing explosion of flavors in each spoonful. It’s unusual because it has an intense lemon flavor and a velvety, almost custard-like texture. May sound a bit odd but that combination of lemon, rice, chicken and veggies is phenomenal and every time I inhale a bowl I promise myself that I’m going to make it. I discovered you can buy it by the can online but I had that promise hanging over my head so I peeled myself off the couch and got into the kitchen. After consulting several recipe and travel websites, and a friend’s Yiayia, I decided to give it a whirl and it turned out beautifully! I didn’t want to spend a whole Sunday in the kitchen so I simplified a lot of the steps (Sorry, Yiayia!) to be more realistic to my busy lifestyle. I also thought it might be an interesting change to try orzo instead of rice. You can stick with rice if you prefer though. I hope you enjoy!

Avgolemono

Image

Ingredients:

  • 1 T. extra virgin olive oil
  • 1 medium onion, diced
  • 2 cloves of garlic, minced
  • 1/2 cup carrot, minced
  • 1/2 cup celery, minced
  • 8 cups of chicken broth
  • 1/2 cup of fresh lemon juice
  • 2 chicken breasts
  • 1/2 cup of orzo, uncooked
  • 2 T. flour
  • 1 T. butter, melted
  • 4 egg yolks
  • Salt & Pepper
  • Fresh chopped parsley
  1. In a large pot, saute onion, garlic, carrots, and celery until softened. Add chicken broth and lemon juice and bring to a boil.
  2. Reduce heat to medium high and add chicken breasts. Let cook for 15 minutes or until chicken is cooked. Remove chicken to cool and reduce liquid to simmer.
  3. Add orzo
  4. Mix melted butter and flour and add to the pot.
  5. In a large bowl, beat the egg yolks. Gradually add in some of the hot liquid from the pot to the egg mixture, beating vigorously in between so you bring it up to temperature slowly without the eggs scrambling. You’ll end up adding about 2 cups of liquid in the end.
  6. Add the egg yolk mixture to the pot and stir. Season with salt and pepper.
  7. Shred chicken and add back to the pot.
  8. Let simmer for a few minutes until orzo has fully cooked.
  9. Garnish with chopped parsley and enjoy!

Image

If you really want to go Greek, you can also serve with stuffed grape leaves! Yummy!

Rosa de Jamaica

While visiting my boyfriend’s family in Guatemala last Christmas, I fell in love with the most amazing drink, Rosa de Jamaica, or Hibiscus Flower Tea. In Spanish, it means the Rose of Jamaica. The drink it produces is tangy, fruity, and sweet, all wrapped up in a vibrant berry red color. It took only one sip to convert me to its magical powers and I was absolutely shocked to hear it was a tea made from flowers and not a local Kool-Aid of sorts.

Image

Turns out the hibiscus flower actually has many medicinal properties to it and is loaded with Vitamin C. Consuming hibiscus helps:

  • Digestion
  • Lower Blood Pressure
  • Coughs
  • Reduces the absorption of UV radiation in the skin
  • Slows hair loss
  • Slows hair turning gray

See, it is magic!

So delicious and definitely a drink I wanted to make back home. After consulting a few family members, I had the recipe in hand. I made a pitcher of it yesterday and it was like being teleported right back to Antiqua. So here’s the recipe:

Rosa de Jamaica

  • 1 cup hibiscus flowers* These can be found at most Latin or Asian supermarkets, tea shops, or you can buy online HERE. Here’s a photo of what the loose flowers look like: 
    Image
  • 8 cups of boiling water
  • 1 1/4 cups sugar
  • 2 limes
  • Ground ginger
  • Ground cinnamon
  • Ground cloves
  1. Place hibiscus flowers, sugar, and spices in the bottom of a pitcher or large bowl and add 8 cups of boiling water.
  2. Quarter the limes, squeeze the juice in, and add to the mixture. Stir until well incorporated.
    Image
  1. Let sit for 20 minutes
  2. Strain out the flowers and limes and then chill for several hours.
  3. Enjoy!

Image

I hope you’ll try this recipe! It’s also a fabulous mixer for cocktails. 🙂

Glorious Garlic & Lime Rotisserie Chicken

Rotisserie chicken is truly the most glorious thing. EVER. To follow up my earlier post about purchasing my rotisserie machine, I am proud to say that I made my first rotisserie chicken and it came about beautifully! Image

You could certainly replicate it by roasting but I’m completely sold on my rotisserie machine so if you have one, USE IT! It’s so much easier than roasting a chicken and the flavor is all the proof you need. Here’s the recipe:

Garlic & Lime Rotisserie Chicken

1 Whole Chicken*. I used a 5 lb. chicken. No matter the size, you’ll want to plan on 15 minutes per pound and also note that you’re looking for an internal temp of 170-180°F.
1/2 cup of butter, softened
2 T. of minced garlic
3 limes, zested and juiced
Ground Pepper
Kosher salt

If your chicken comes with a pack of innards, remove and throw out. Wash and dry the chicken and season the cavity liberally with salt and pepper and set aside.

In a small bowl, combine softened butter with minced garlic, 1 tsp. ground pepper, 2 tsp. kosher salt, and zest and juice of the three limes. Work the garlic butter mixture under the skin of the chicken. spread around liberally. Reserve about a tablespoon to spread on top of the skin.

Using elastic food ties or butcher’s twine, truss the chicken. If you don’t have elastic food ties and want a super quick and easy way to truss the chicken with butcher’s twine, click HERE.

Place chicken on the spit rods and set time for 75 minutes or until the internal temperature is 170-180°F. When the timer goes off, let the chicken rest for 10 minutes in the rotisserie instead of on the counter by having it spin without heat. After it’s rested, remove and serve.

***Roasting Method*** For those roasting in the oven, bake at 425°F for 1 1/2 hours or juices run clear. Internal temp should 170-180°F.

Random side note: If you are looking for an inexpensive digital food thermometer, here’s a link to the one I own and LOVE: http://amzn.to/11NSzuG